| .. | ||
| resources | ||
| README.md | ||
Postgresql Database
Walkthrough of installing Postgresql database.
Table of Contents
- Step 1 - Installing Postgresql
- Step 2 - Create user and database.
- Step 3 - Configure postgresql
- Step 4 - Configure access
Step 1 - Installing Postgresql
sudo apt-get update
sudo apt-get -y install postgresql
Step 2 - Create User and Database
sudo adduser --system --shell /bin/bash --group --disabled-password --home /home/git git
su -c "psql" - postgres
Change postgresql password.
ALTER USER postgres WITH PASSWORD 'new_password';
Create app user etc.
CREATE ROLE git WITH LOGIN PASSWORD 'userpass';
CREATE DATABASE gitdb WITH OWNER git TEMPLATE template0 ENCODING UTF8 LC_COLLATE 'en_US.UTF-8' LC_CTYPE 'en_US.UTF-8';
Step 3 - Configure Postgresql
Next, You need to switch to 'SCRAM-SHA-256' scheme from md5 encryption scheme for better security. If you want to connect to PostgreSQL remotely, then you need to allow your IP address in the PostgreSQL configuration file.
/etc/postgresql/versionNum/main/postgresql.conf
Next, change the following variables as per your requirement:
listen_addresses = 'localhost, IF_REMOTEIP'
password_encryption = scram-sha-256
sudo systemctl restart postgresql
Step 4 - Configure Access
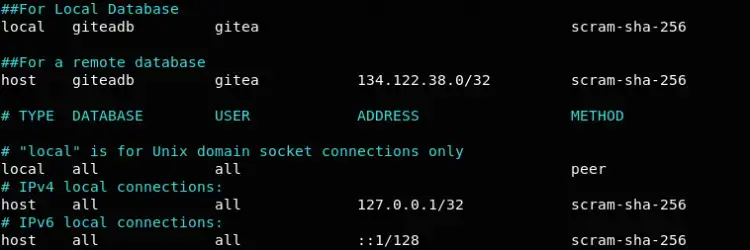
At this point, your PostgreSQL setup and ready for your app user, verify authentication settings in /etc/postgresql/14/main/pg_hba.conf file.
PostgreSQL accepts all local connections by defaults.
/etc/postgresql/versionNum/main/pg_hba.conf
